WinFramework轻量级开发框架 | 主从表窗体开发指南|详细二次开发|C/S开发框架

C/S结构快速开发框架/软件快速开发平台WinFrameworkV2.1轻量级框架原创软件@csframework.com
在实战开发 《主从表窗体开发指南-采购订单》中,我们能快速生成一个标准的主从表窗体,接下来我们针对生成的窗体进行二次开发和界面调整,比如,订单状态,结算方式,供应商,要改为 LookUpEdit下拉选择,单据日期要改为日期类型。
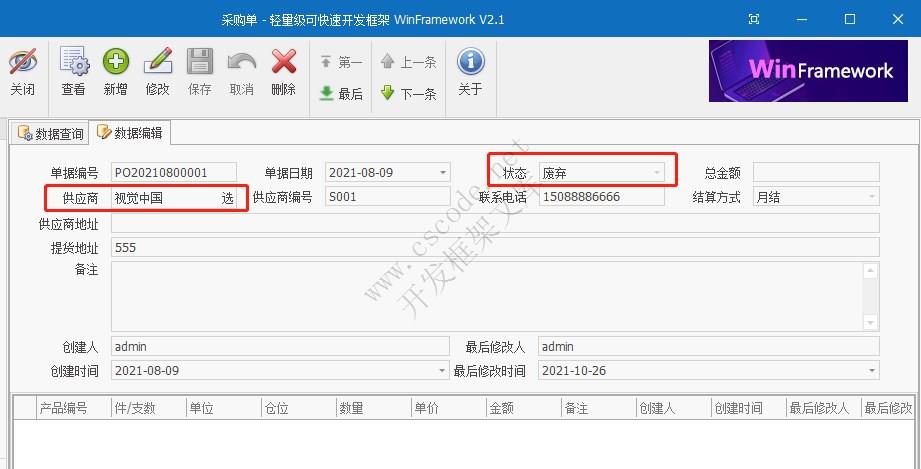
1. 【订单状态】改为LookUpEdit下拉组件
1.1 【数据】页面中【订单状态】控件类型改为LookUpEdit组件。
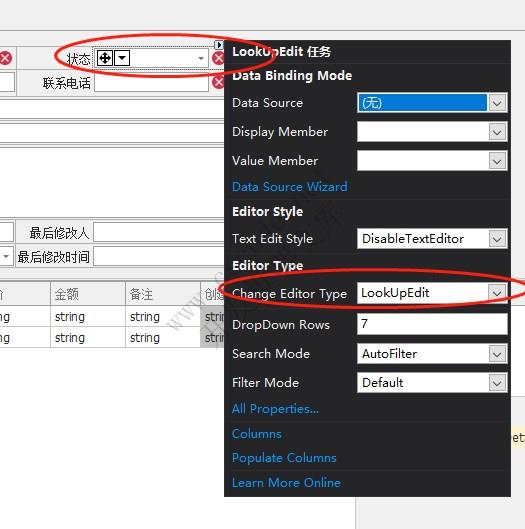
如果数据绑定模式选择了辅助控件的方式,修改了控件类型后,还需要对控件进行数据绑定:

否则,输入控件无法和数据字段关联!
1.2 【订单状态】数据绑定方法
在Model层中定义订单状态DocType,枚举类型:
using System;
using System.Collections.Generic;
using System.Linq;
using System.Text;

namespace WinFrameworkDemo.Models
{
    public enum DocType
    {
        挂起 = 0,
        提交 = 1,
        废弃 = -1
    }
}
然后再WinFramework.Library.DataBinderTools.cs 中新增一个公共静态方法,用于绑定 订单状态 LookUpEdit组件的数据源:
/// <summary>
/// 绑定订单类型,挂起,提交,撤销
/// </summary>
/// <param name="lue"></param>
public static void BoundDocType(LookUpEdit lue)
{
	BoundDocType(lue.Properties);
}

/// <summary>
/// 绑定订单类型,挂起,提交,撤销
/// </summary>
/// <param name="lue"></param>
public static void BoundDocType(RepositoryItemLookUpEdit lue)
{
	DataTable dt = Tools.EnumToDataTable(typeof(WinFrameworkDemo.Models.DocType), "Name", "Value");
	InitializeControl(lue, new string[] { "状态" }, new string[] { "Name" });
	BoundDatabase(lue, dt, false, false, "Name", "Value");
}
1.3 在窗体代码中绑定【订单状态】的下拉数据源
在窗体frm_Load事件中绑定 页面 订单状态控件的数据源:
//绑定订单状态
DataBinderTools.Bound.BoundDocType(txtDocType);

1.4 测试看效果
看到状态字段已经变成了选择
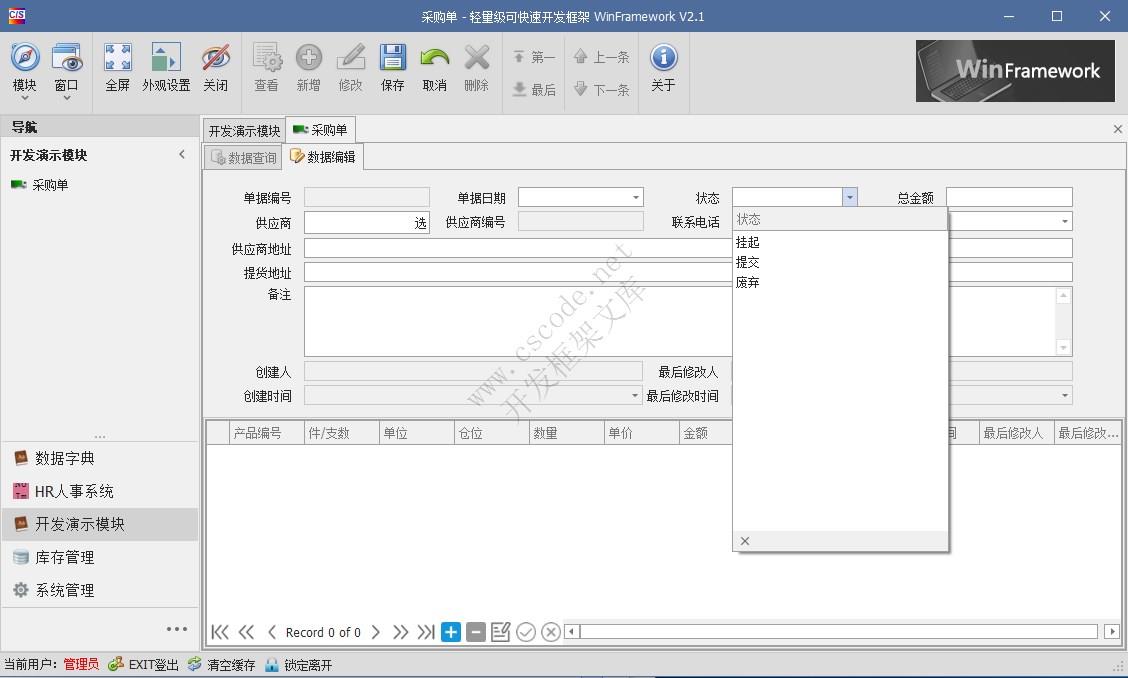
修改状态下的展示:

2. 查询表格中【订单状态】列绑定数据源
现在我们发现,在查询表格中,显示状态还是显示值,而不是显示描述:
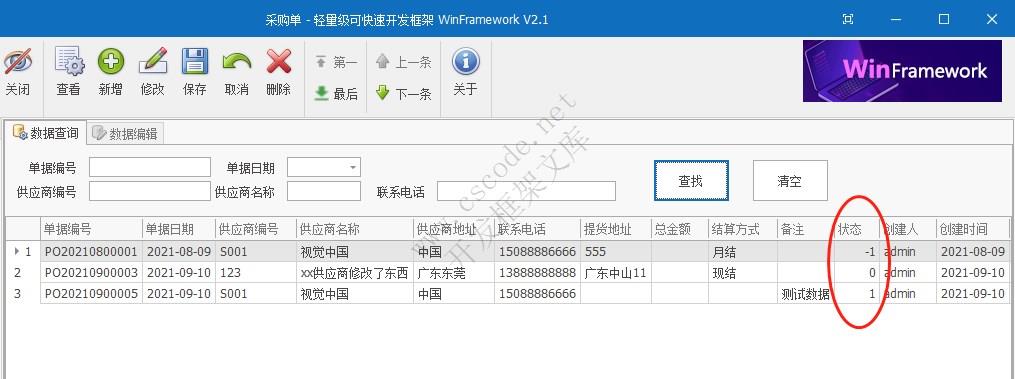
我们期望像【页面】那样,显示出对应的文本描述。

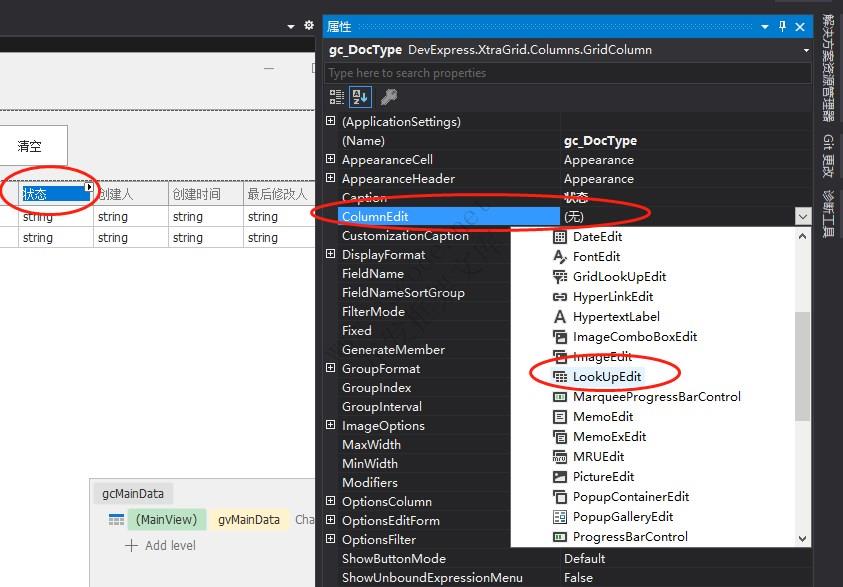
2.1 将【状态】列的自定义组件类型设置为LookUpEdit下拉组件
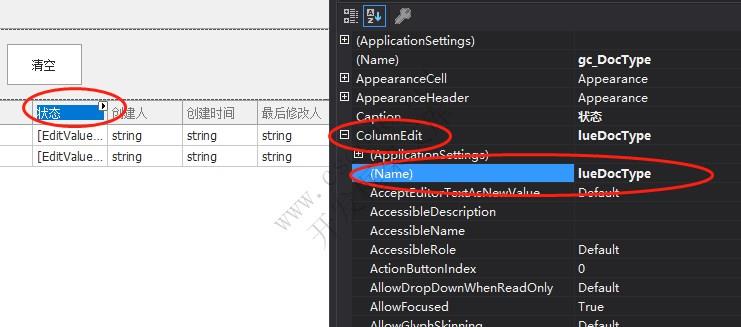
控件名字修改为 lueDocType
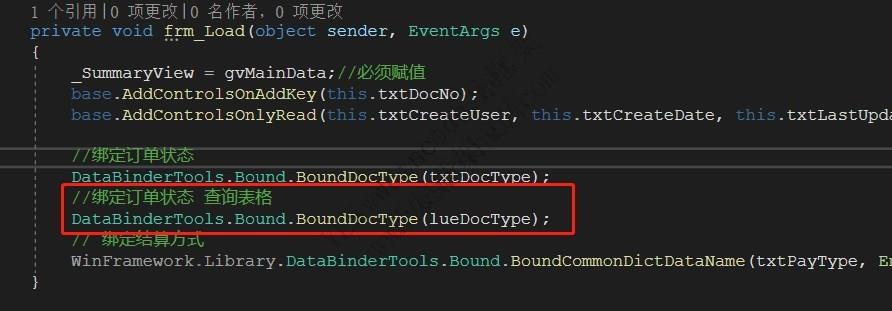
2.2 在窗体Load事件中添加数据绑定
//绑定订单状态 查询表格
DataBinderTools.Bound.BoundDocType(lueDocType);
2.3 测试看效果
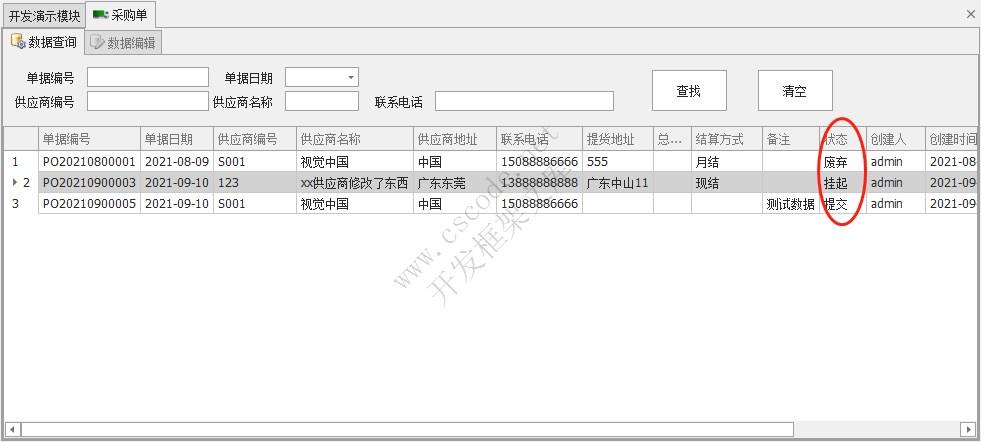
在查询界面中,表格中【状态】列已经显示出状态描述。
3. 【结算方式】设置为公共数据字典的数据源
【结算方式】选择在公共字典中配置。
3.1 公共字典中添加 结算方式
修改 WinFrameworkDemo.Business.CustomerEnum.EnumCommonDicData枚举类型。
增加一个枚举值:结算方式
namespace WinFrameworkDemo.Business.CustomerEnum
{
    /// <summary>
    /// 基础字典
    /// </summary>
    public enum EnumCommonDicData
    {
        产品材质 = 1,
        单位,
        结算方式, //添加新类型
        配送方式,
        //扩展以下3个类型
        付款方式,
        货币类型
    }
}
3.2 运行程序管理和配置公共字典类型
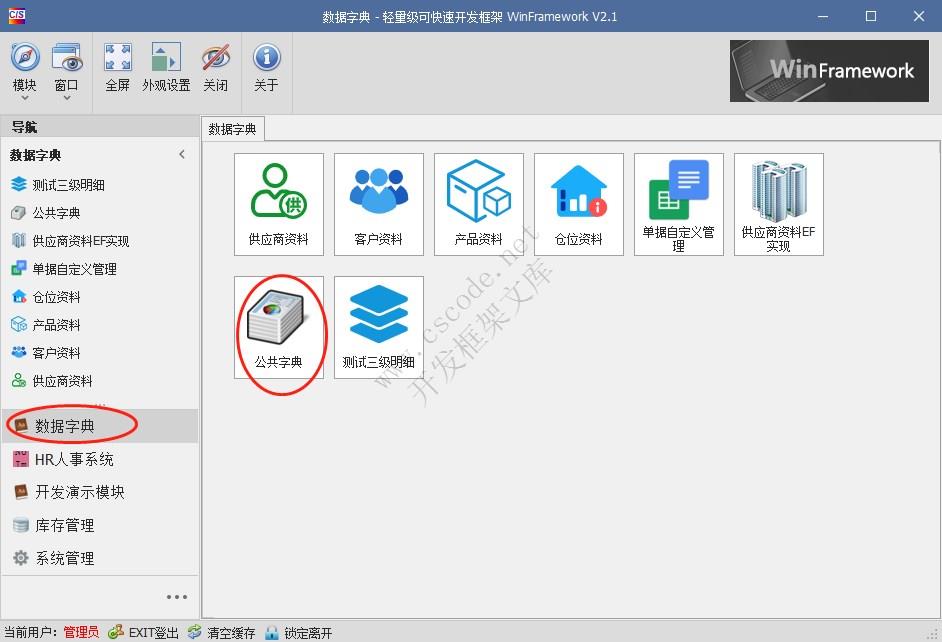
运行项目,打开 基础字典 → 公共字典 管理窗体:
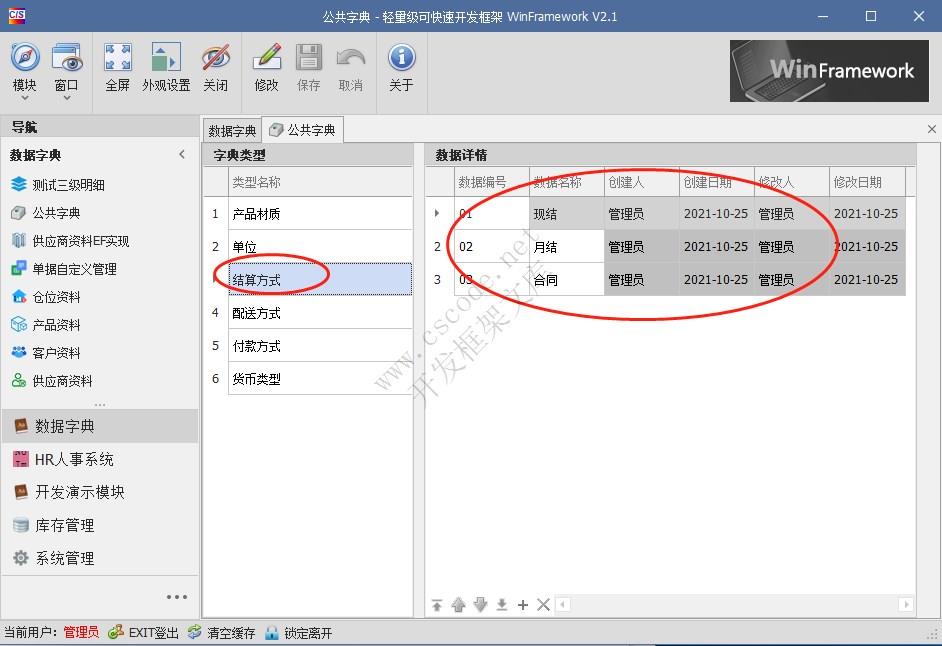
我们能看到【公共字典】类型已经添加了【结算方式】的类型:
3.3 添加数据详情
接下来完善【结算方式】的明细数据:
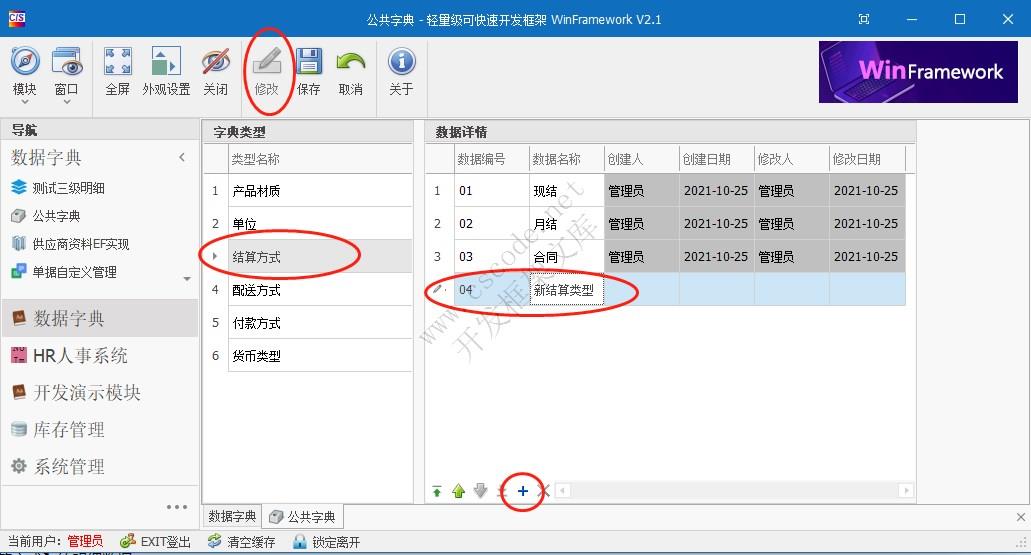
点【保存】按钮。
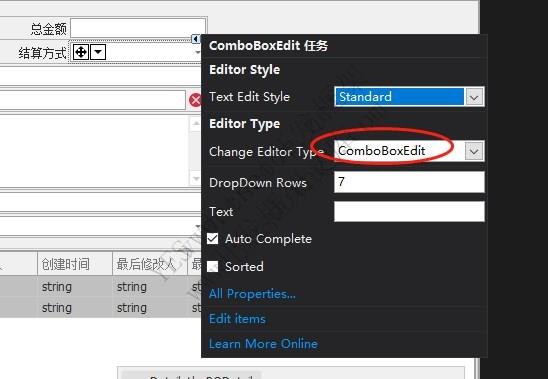
3.4 修改【结算方式】控件类型
把【结算方式】控件类型改为ComboBoxEdit类型:
若数据绑定模式选择辅助控件的方式,修改了控件类型后,还需要对控件进行数据绑定:

否则,控件无法和数据字段关联,导致保存数据失败!
3.5 窗体Load事件中绑定结算状态数据源
// 绑定结算方式
WinFramework.Library.DataBinderTools.Bound.BoundCommonDictDataName(txtPayType, EnumCommonDicData.结算方式, false);

WinFramework框架已经集成了公共字典数据源的统一绑定方法,这里不需要扩展DataBinderTools的方法。
3.6 测试看效果
新增状态


4. 【供应商】通用选择窗体
4.1 通用选择弹窗
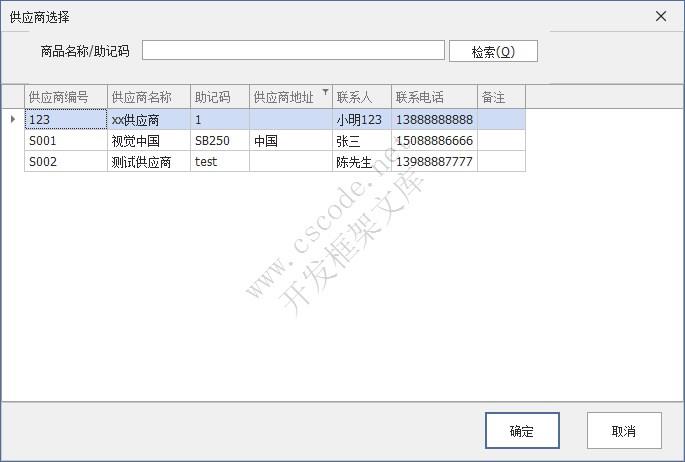
供应商我们期望从 基础资料 → 供应商资料 中获取。通过弹窗方式选择供应商资料:
4.2 添加SearchButton 自定义控件
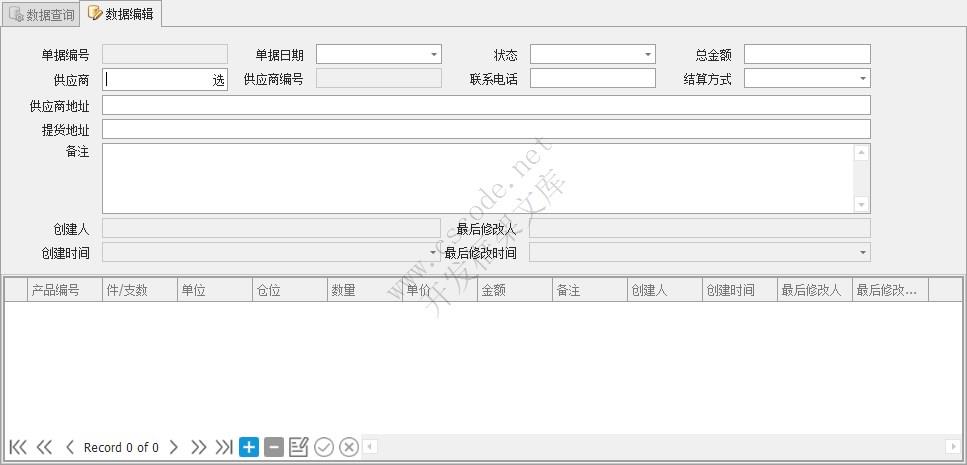
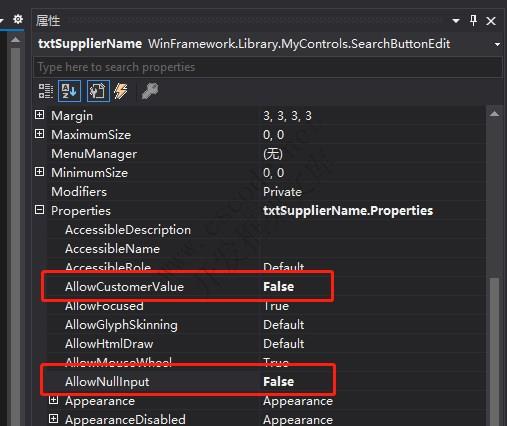
把【数据】页面 【供应商】控件改为 SearchButton自定义控件。
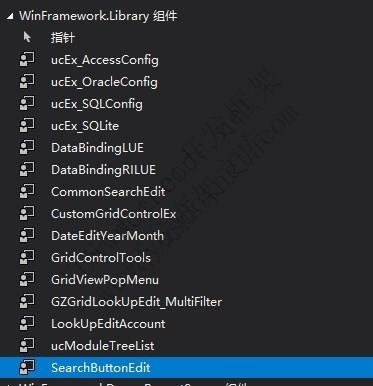
在工具箱中拖拽一个 SearchButtonEdit到窗体中,然后替换掉供应商的控件。
调整后界面
设置属性
4.3 弹窗界面设计
在 WinFramework.Library.SearchEditDialog 中添加一个Windows窗体命名为 frmSearchDialog_Supplier ,
frmSearchDialog_Supplier继承自SearchTextEdit.frmDialogDataSearchBase
public partial class frmSearchDialog_Supplier : SearchTextEdit.frmDialogDataSearchBase
frmSearchDialog_Supplier.cs 主要代码
using System;
using System.Collections.Generic;
using System.ComponentModel;
using System.Data;
using System.Drawing;
using System.Linq;
using System.Text;
using System.Windows.Forms;
using WinFrameworkDemo.Business.Data;

namespace WinFramework.Library.SearchEditDialog
{
    public partial class frmSearchDialog_Supplier : SearchTextEdit.frmDialogDataSearchBase
    {
        BLL_Supplier bll;
        public frmSearchDialog_Supplier()
        {
            InitializeComponent();
            bll = new BLL_Supplier();
        }


        protected override void OnShown(EventArgs e)
        {
            base.OnShown(e);
            if (!String.IsNullOrEmpty(SearchCode))
            {
                txt_Code.Text = SearchCode;
            }
            LoadData();
            if (DataSource != null && DataSource.Rows.Count > 0)
                gridView1.Focus();
            else
                txt_Code.Focus();

        }


        public DataTable DataSource;
        private void btn_Search_Click(object sender, EventArgs e)
        {
            LoadData();
        }

        void LoadData()
        {
            DataSource = bll.Search(txt_Code.Text, "", "");
            gridControl1.DataSource = DataSource;
            gridView1.BestFitColumns();
        }
        //处理数据
        public override object GetSelect(out object EditValue, out bool Success)
        {
            EditValue = null;
            Success = false;
            DataRow dr = gridView1.GetFocusedDataRow();
            if (dr == null) return null;
            EditValue = dr[WinFrameworkDemo.Models.dt_Data_Supplier.SupplierName];
            Success = true;
            return dr;
        }
        //验证是否选择数据
        protected override bool ValidateForSelect()
        {
            return gridView1.FocusedRowHandle >= 0;
        }
        //验证返回数据是否正确,
        protected override bool ValidateObject(object obj)
        {
            return obj != null;
        }

        private void gridView1_DoubleClick(object sender, EventArgs e)
        {
            doSelect();
        }
    }
}
供应商业务逻辑层 BLL_Supplier 代码:
 public class BLL_Supplier : Base.bllBaseUserCommon
{
    public BLL_Supplier()
        : base(typeof(dt_Data_Supplier))
    {
    }

    public DataTable Search(string Code, string ZJM, string SupplierName)
    {
        string spname = "usp_Supplier_Search";
        SqlParameterProvider p = new SqlParameterProvider();
        if (!String.IsNullOrEmpty(Code)) p.AddParameter("@Code", SqlDbType.VarChar, 20, Code);
        if (!String.IsNullOrEmpty(ZJM)) p.AddParameter("@ZJM", SqlDbType.VarChar, 20, ZJM);
        if (!String.IsNullOrEmpty(SupplierName)) p.AddParameter("@SupplierName", SqlDbType.VarChar, 20, SupplierName);
        return dal.DBHelper.GetTableSP(spname, Models.dt_Data_Supplier._TableName, p);
    }
}
4.4 SearchButtonEdit组件绑定弹窗
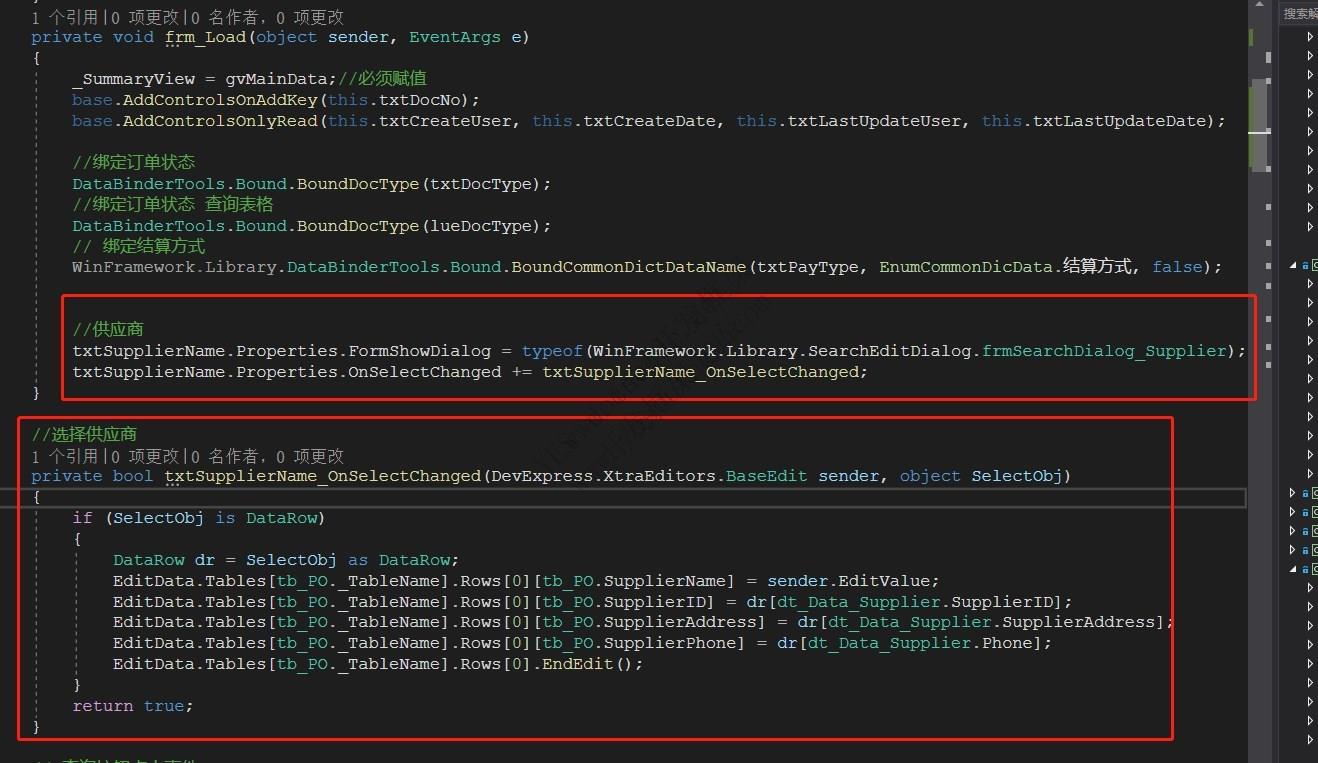
在窗体Load事件中添加代码绑定供应商组件打开弹窗选择窗体:
//供应商
txtSupplierName.Properties.FormShowDialog = typeof(WinFramework.Library.SearchEditDialog.frmSearchDialog_Supplier);
txtSupplierName.Properties.OnSelectChanged += txtSupplierName_OnSelectChanged;


//选择供应商事件代码
private bool txtSupplierName_OnSelectChanged(DevExpress.XtraEditors.BaseEdit sender, object SelectObj)
{
	if (SelectObj is DataRow)
	{
		DataRow dr = SelectObj as DataRow;
		EditData.Tables[tb_PO._TableName].Rows[0][tb_PO.SupplierName] = sender.EditValue;
		EditData.Tables[tb_PO._TableName].Rows[0][tb_PO.SupplierID] = dr[dt_Data_Supplier.SupplierID];
		EditData.Tables[tb_PO._TableName].Rows[0][tb_PO.SupplierAddress] = dr[dt_Data_Supplier.SupplierAddress];
		EditData.Tables[tb_PO._TableName].Rows[0][tb_PO.SupplierPhone] = dr[dt_Data_Supplier.Phone];
		EditData.Tables[tb_PO._TableName].Rows[0].EndEdit();
	}
	return true;
}
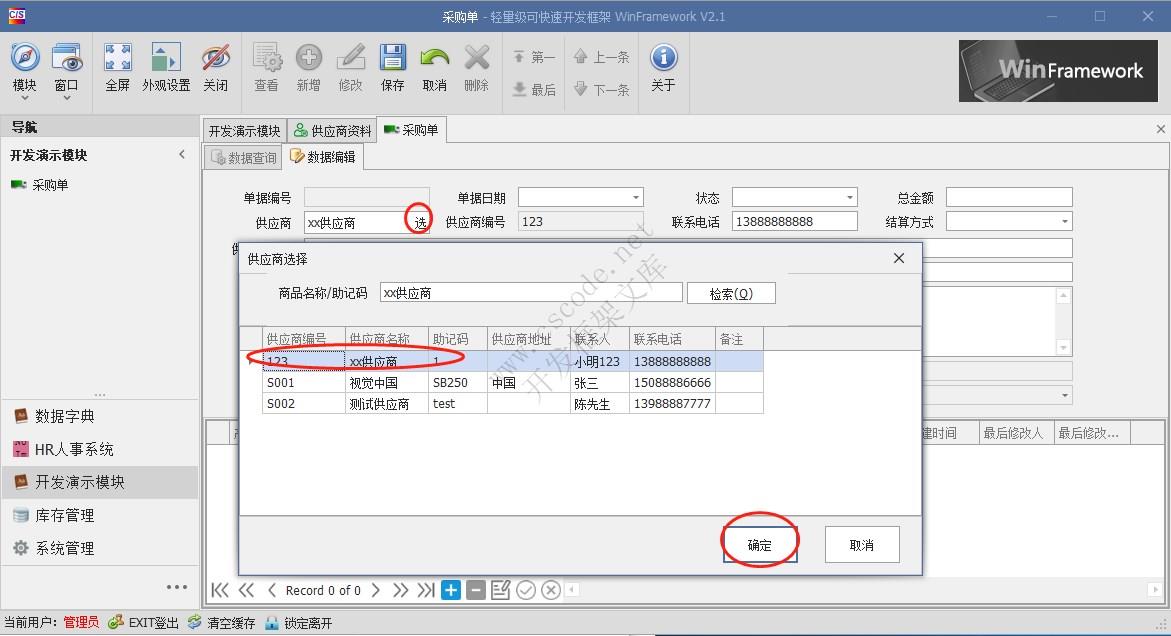
4.5 测试看效果
点击供应商右边的选字,就弹出了供应商选择弹窗,双击选择后,自动回填相关数据:
5. 设置文本框只读属性
经过上面调整组件后,【数据】页面的【供应商编号】不能支持修改的:

5.1 设置【供应商编号】为只读
在frm_Load事件中,调用base.AddControlsOnlyRead()方法,添加【供应商编号】控件设置为只读:
// 设置只读
base.AddControlsOnlyRead(this.txtSupplierID, this.txtCreateUser, this.txtCreateDate, this.txtLastUpdateUser, this.txtLastUpdateDate);
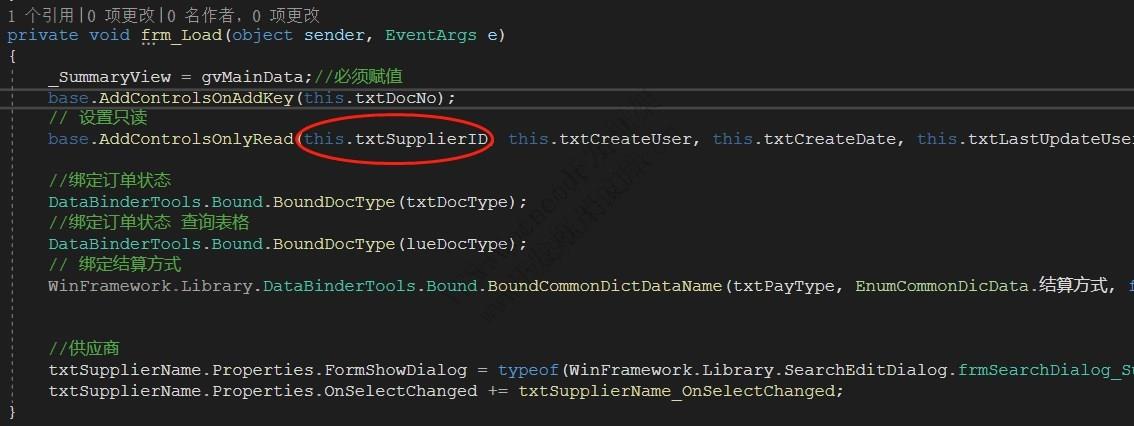
这样,供应商编号就变成了只读控件,不允许更改了。当选择供应商,自动赋值。


6. 单据编号自动生成
最后,我们配置单据编号自动生成规则,让系统自动生成唯一的流水单号。
6.1 添加一个单号模型
在WinFrameworkDemo.Models.DocSN中添加【采购单流水单号】模型类SN_PONO,继承 WinFrameworkDemo.Models.Sys.ModelDocNo类。
SN_PONO.cs 代码
using WinFrameworkDemo.Models.Sys;
using System;
using System.Collections.Generic;
using System.Linq;

namespace WinFrameworkDemo.Models.DocSN
{
    public class SN_PONO : ModelDocNo
    {
        public SN_PONO()
        {
            this.DocCode = "PONO";
            this.DocName = "采购单编号";
            this.DocHeader = "P";
            this.Length = 3;
            this.DocType = WinFrameworkDemo.Models.DocSN.GenerateDocSNRule.Year_Month;
        }
    }
}
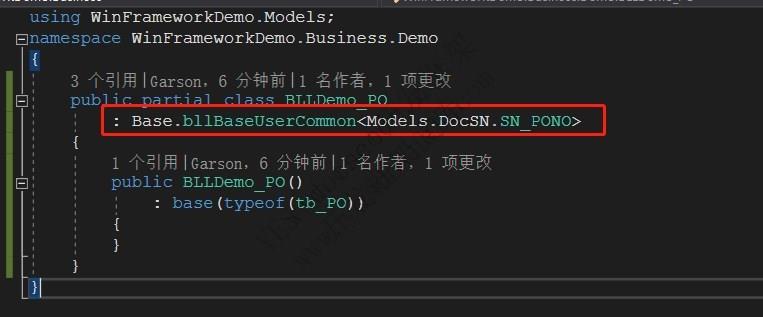
6.2 修改 BLL层的 BLLDemo_PO.cs 代码
在WinFrameworkDemo.Business.Demo.BLLDemo_PO.cs 中 添加 采购单流水单号模型 配置:
using WinFrameworkDemo.Models;
namespace WinFrameworkDemo.Business.Demo
{
    public partial class BLLDemo_PO
        : Base.bllBaseUserCommon<Models.DocSN.SN_PONO>
    {
        public BLLDemo_PO()
            : base(typeof(tb_PO))
        {
        }
    }
}
6.3 取消单据号码验证
单据号码作为自动生成的流水号码,可以取消单据编号数据验证,ValidateType改为:_不判断

6.4 设置单据编号文本框为只读
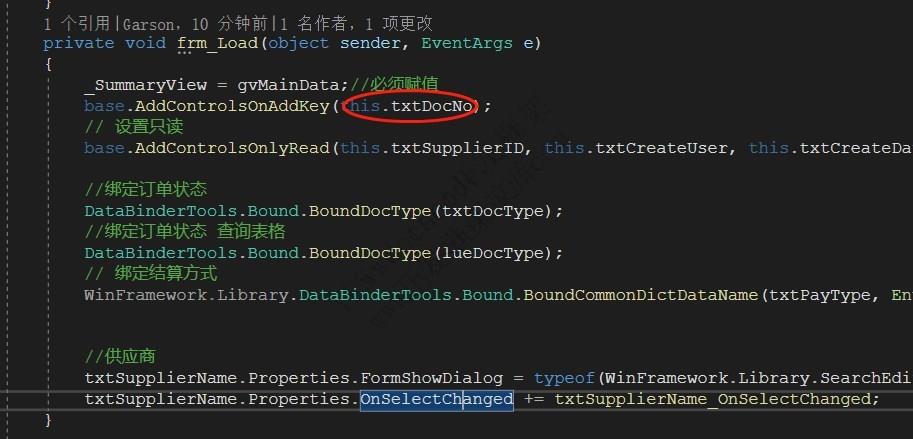
在frm_Load事件:
- AddControlsOnAddKey方法中 如果有 txtDocNo参数,则取消
- AddControlsOnlyRead方法添加 txtDocNo参数
修改前:
修改后:
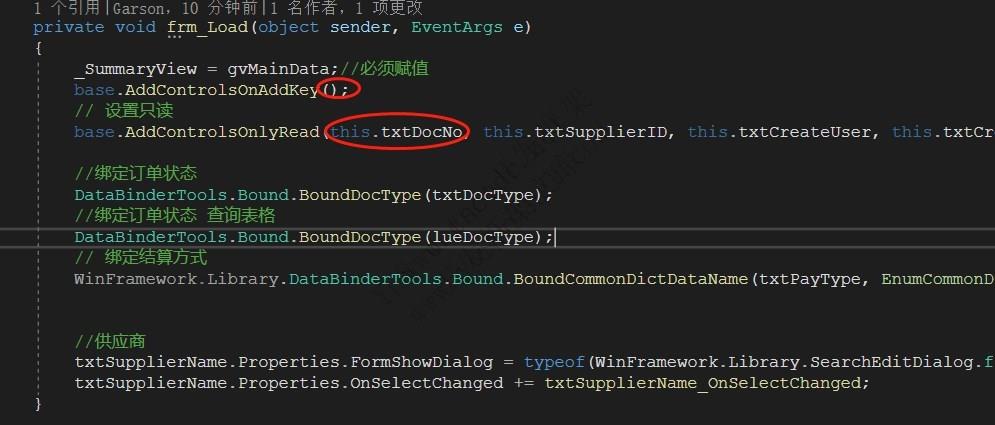
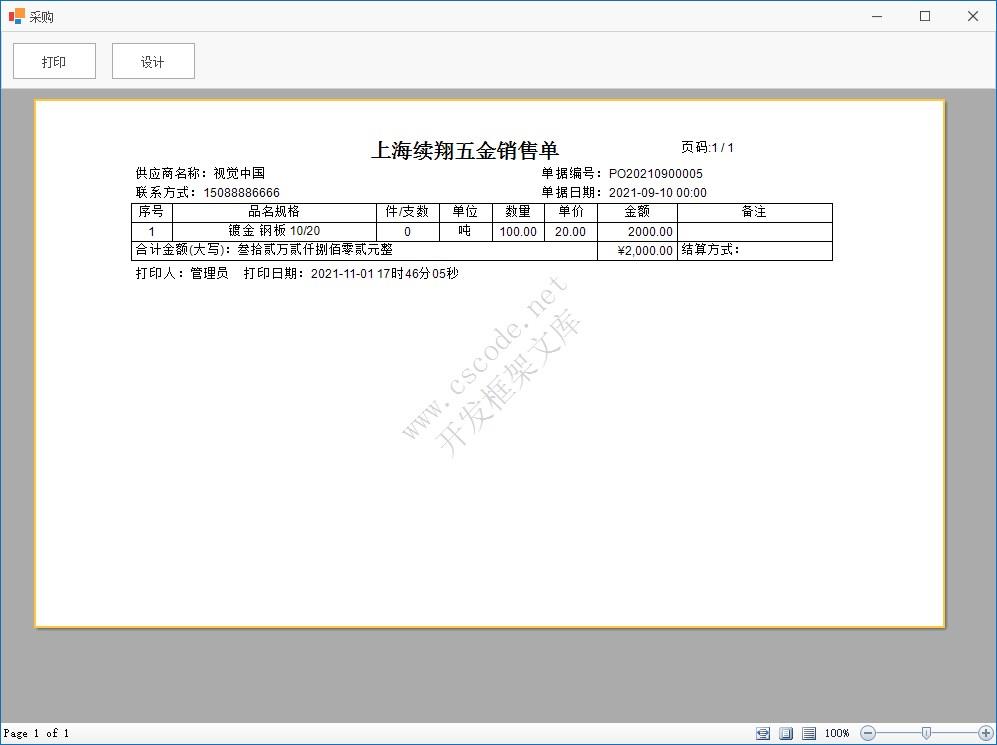
7. 报表打印
7.1 窗体权限设置 FormAuthority
frmPO窗体添加报表打印权限,FunctionAuthorityCommon.PREVIEW
protected override int FormAuthority
{
    get
    {
        return base.FormAuthority + FunctionAuthorityCommon.PREVIEW;
    }
}
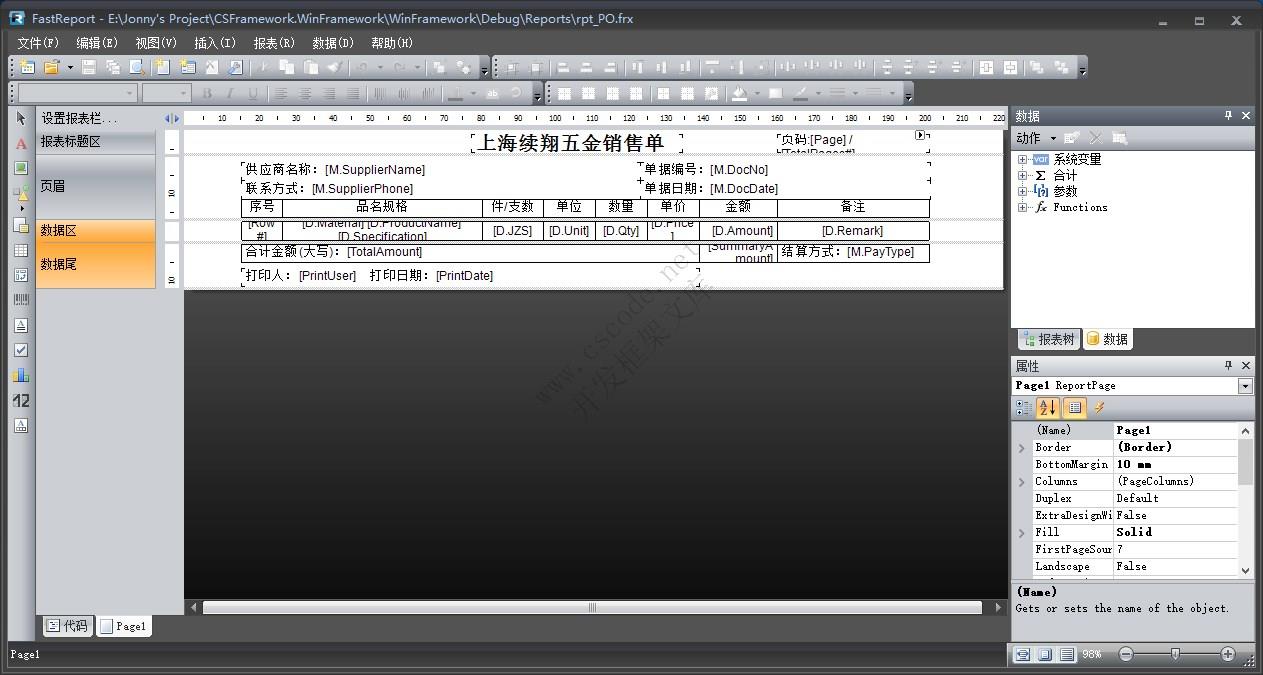
7.2 报表模板设计
报表模板文件存放位置:程序目录 \ reports \ ***.frx
7.3 重写窗体的 DoPreview方法
/// <summary>
/// 打印预览
/// </summary>
protected override void DoPreview(object sender)
{
    if (gvMainData.FocusedRowHandle < 0) return;
    string docno = gvMainData.GetFocusedRowCellValue(tb_PO.DocNo) + "";
    DataSet ds = bll.DoGetDocData(docno);

    bool v = ((int)Models.DocType.提交).Equals(ds.Tables[tb_PO._TableName].Rows[0][tb_PO.DocType]);
    if (v == false)
    {
        Msg.Warning("当前单据未提交,不允许打印!");
        return;
    }

    string filename = Path.Combine(AppDomain.CurrentDomain.BaseDirectory, "Reports\\rpt_PO.frx");
    RptCommonMainDetail rptHelper = new RptCommonMainDetail(this, filename, ds.Tables[tb_PO._TableName], ds.Tables[tb_PODetail._TableName]);
    rptHelper.BeforePrepare += RptHelper_BeforePrepare;
    ReportServer.frmRptPreview.ShowForm(rptHelper);
}
private void RptHelper_BeforePrepare(global::FastReport.Report rpt)
{
    var total = (decimal)(rpt.GetDataSource("D").Reference as DataTable).Compute($"SUM({Models.tb_PODetail.Amount})", "1=1");
    string str = WinFramework.Common.RMBConverter.toRMB(total);
    var PrintUser = rpt.Parameters.FindByName("TotalAmount");
    if (PrintUser != null) PrintUser.Value = str;
}
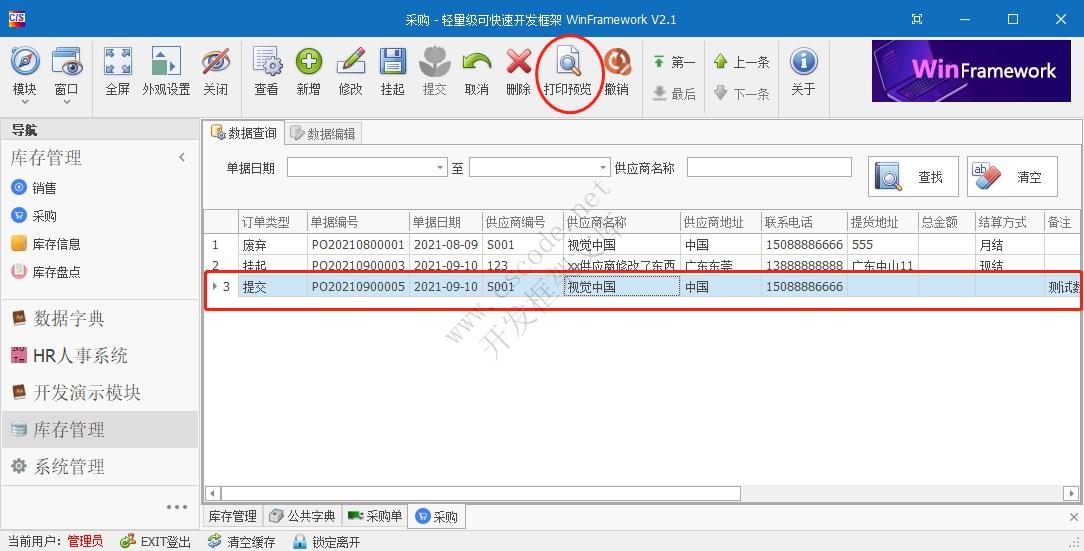
7.4 功能测试
打开 【采购单】功能,选择一条记录,然后点击【打印预览】按钮

扫一扫加作者微信
 在线客服
在线客服


